
Key Takeaways
- Open Preferences to reach invoice column settings.
- Rename default columns to fit your work style.
- Hide columns you do not use on invoices.
- Add custom fields for extra details.
- Apply changes to both invoices and estimates.
- Preview documents before sending them to clients.
Billbooks lets you personalize your invoices and estimates to match your business needs. You can rename, hide, or add new columns to make your documents more professional and relevant.
Step-by-Step Guide to Customize Invoice/Estimate Columns
Step 1: Go to Settings
- Log in to your Billbooks account.
- Look at the left sidebar and click on "Settings."
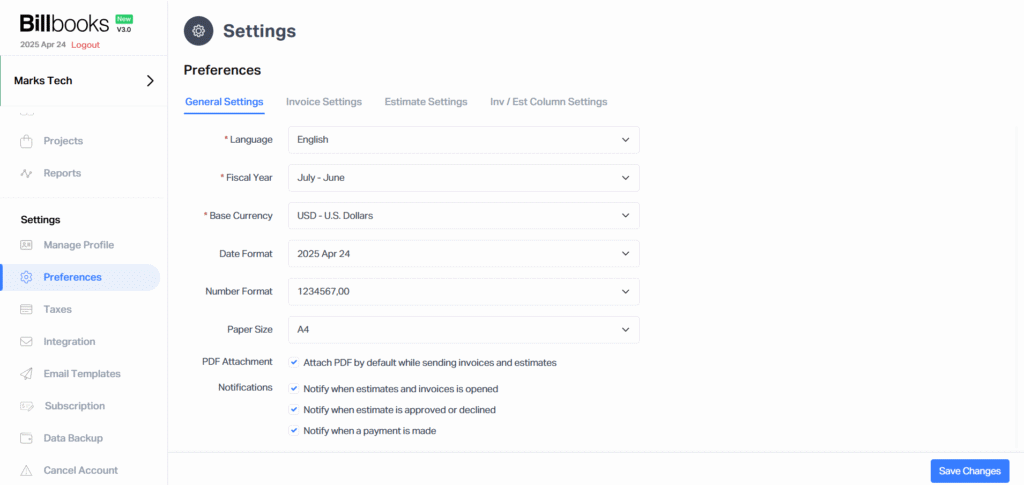
Step 2: Open Preferences
- Under Settings, select "Preferences."
Step 3: Access Invoice/Estimate Column Settings
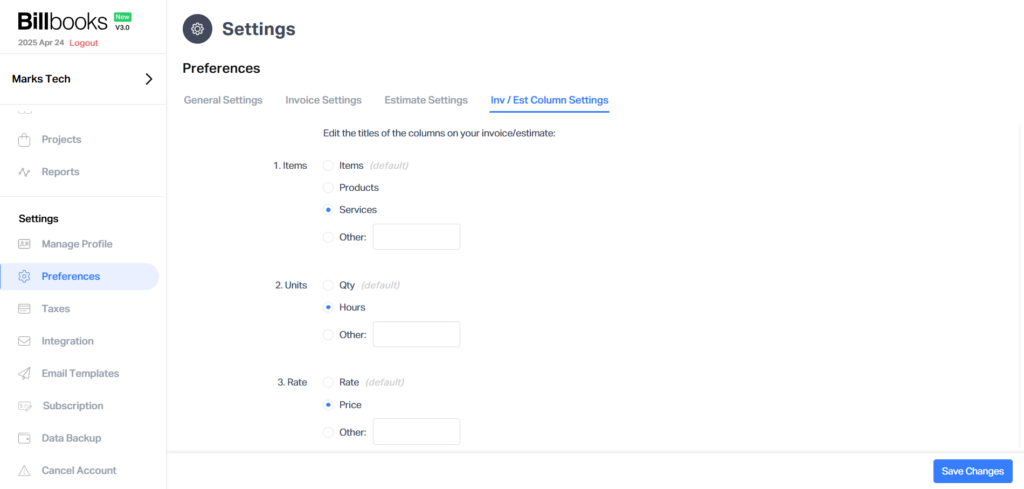
- In the Preferences section, click on the "Inv/Est Column Settings" tab.
Haven't set this up yet?
If you're already exploring what Billbooks can do, this is one of the quickest wins to try next.
Customize Default Columns
By default, Billbooks includes the following invoice columns:
| Default Column | Example Use | You Can Rename It To |
| Items | Product/Service name | Products, Services, Tasks, etc. |
| Qty | Number of units | Hours, Sessions, Pieces, etc. |
| Rate | Price per unit | Price, Fee, Cost, etc. |
| Amount | Total line amount | Charge, Subtotal, etc. |
To rename any of these:
- Click the text field next to the default column name.
- Enter your preferred label (e.g., change “Qty” to “Hours”).
Hide Unnecessary Columns
You can hide any of the following columns:
- Qty
- Rate
- Amount
To hide them:
- In the “Inv/Est Column Settings” tab, uncheck the box next to the column name you want to hide.
- The unchecked columns will not appear in your invoice or estimate.
Add Custom Fields
Billbooks allows you to include additional fields to capture more details.
Predefined Custom Fields:
- Date
- Time
To Add Your Own Custom Field
- Scroll to the Custom Fields section within the same tab.
- Click "Add New Field."
- Enter a field name (e.g., “Technician Name,” “Service Location”).
More features, one dashboard.
See everything Billbooks can do for your invoicing, free to start.
Final Tips
- Preview your invoice after customization to make sure everything looks good.
- These settings apply to both invoices and estimates.
- Tailoring your documents adds a professional touch and ensures clarity for your clients.